
One thing we take for granted in this day and age is the ability to throw our clothes into a machine, forget about ‘em for an hour, then come back have them all nice and clean.
When I was born, my military family was so poor my mother washed diapers for two babies in the bathtub. Not only was it hard on her knees but also on her petite hands as she wrung out all those diapers before hanging them on the line. The day my dad made third class he borrowed a crow (third-class insignia) and wore it home. When my mother saw it she was crying, dancing around the room, and screaming all at the same time, “We’re rich! We’re rich!” His pay had skyrocketed to $190/month. They ran right out before my dad even got his next check and bought a washing machine on payments of $8 a month.
Washing in the sink or bathtub is fine for emergencies but my mother, rest her soul, and lots of other folks will testify that it’s not something you want to do for the long haul.
While living overseas, I washed all my clothes in a concrete laundry sink behind the house using my hands as an agitator, a scrub brush for the tough spots, and wringing everything by hand.
In my quest for self-reliance I knew a manual off-grid clothes-washing system was going to be desirable and in a TEOTWAWKI world, necessary. I also knew I didn’t want to be hand wringing them as my mother had done.
A kindly neighbor gave me a never-used concrete laundry sink that had been sitting in the grass behind his shop since forever so I gladly accepted it. After some research, I decided on a better system and turned the laundry sink into an outdoor sink for washing up after an especially dirty job, and also for cleaning garden produce before taking it into the house. But it still functions as a backup.
HAND-WASHING EQUIPMENT
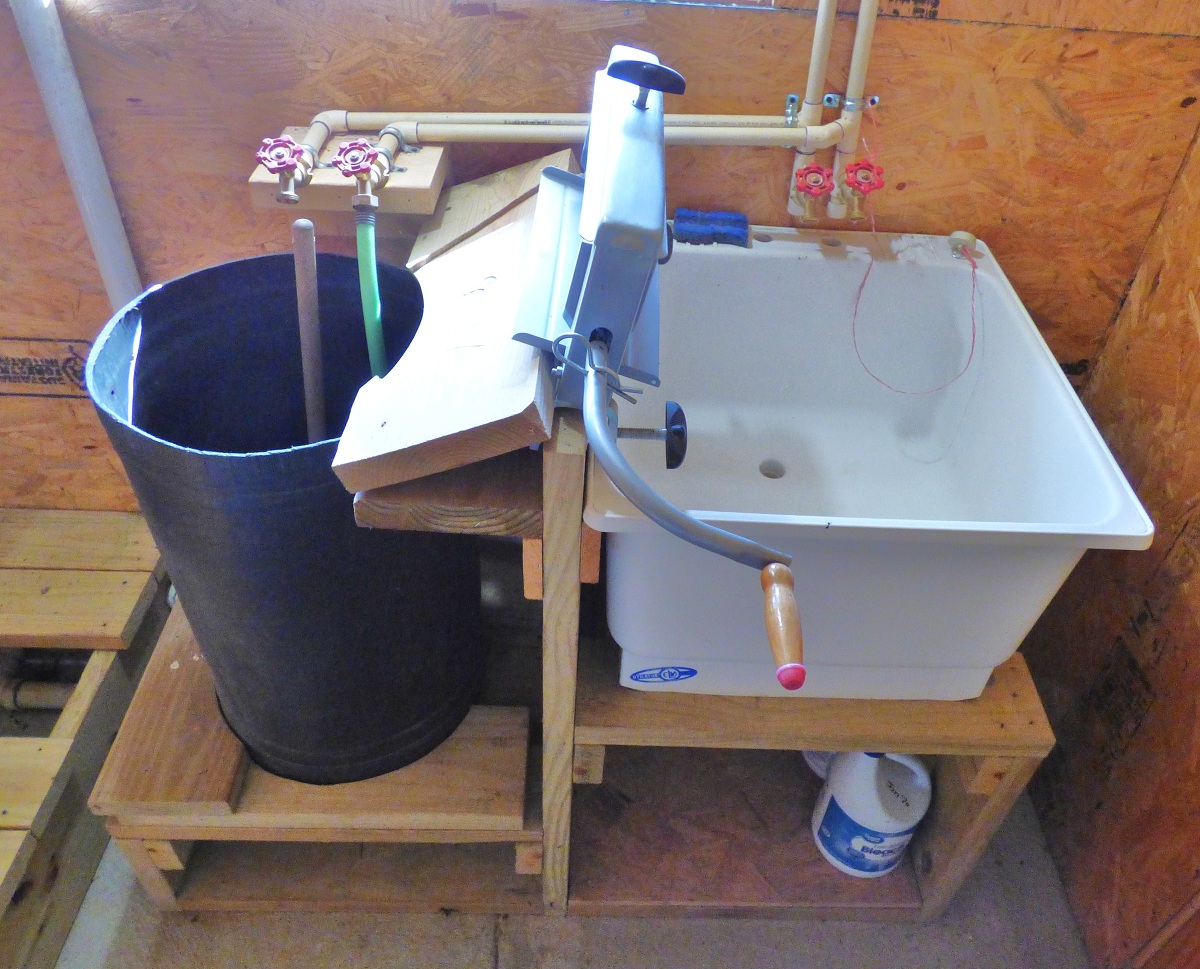
While browsing through Lehman’s Amish catalog, I found just what I was looking for: something called a “breathing mobile washer,” and “Lehman’s best hand wringer,” as seen in Photo 1.

Unlike a soft-rubber toilet plunger, the breathing mobile washer has a hard plastic bell with a sturdy plastic mesh on the bottom resembling a thick spider web. On top of the bell is a smaller bell with an air space between the two. Holes in the top of the larger bell allow water to pass up through the bell and exit at the space between the two bells. This flowing motion allows the mobile washer to move a lot of soapy water through your laundry when it’s plunged up and down.
The hand-crank wringer has brackets on the bottom with two large screw knobs for clamping it to a sturdy upright. The two rollers are adjustable for different thicknesses of laundry items, and below the rollers is a tilting plate that directs the water to the right or the left where it can be drained away.
When I bought both of these items six years ago, they were much less expensive than they are in the most current Lehman’s catalog, ($30 and $249 respectively). The going price for a plunger is around $30 at most places but for the wringer there are cheaper options available online. Whichever plunger you get be sure it has a wooden or metal handle, not plastic.
DESIGN AND CONSTRUCTION
Once I had the hand-washing equipment identified and purchased, I set about building a way to make these two items easier to use.
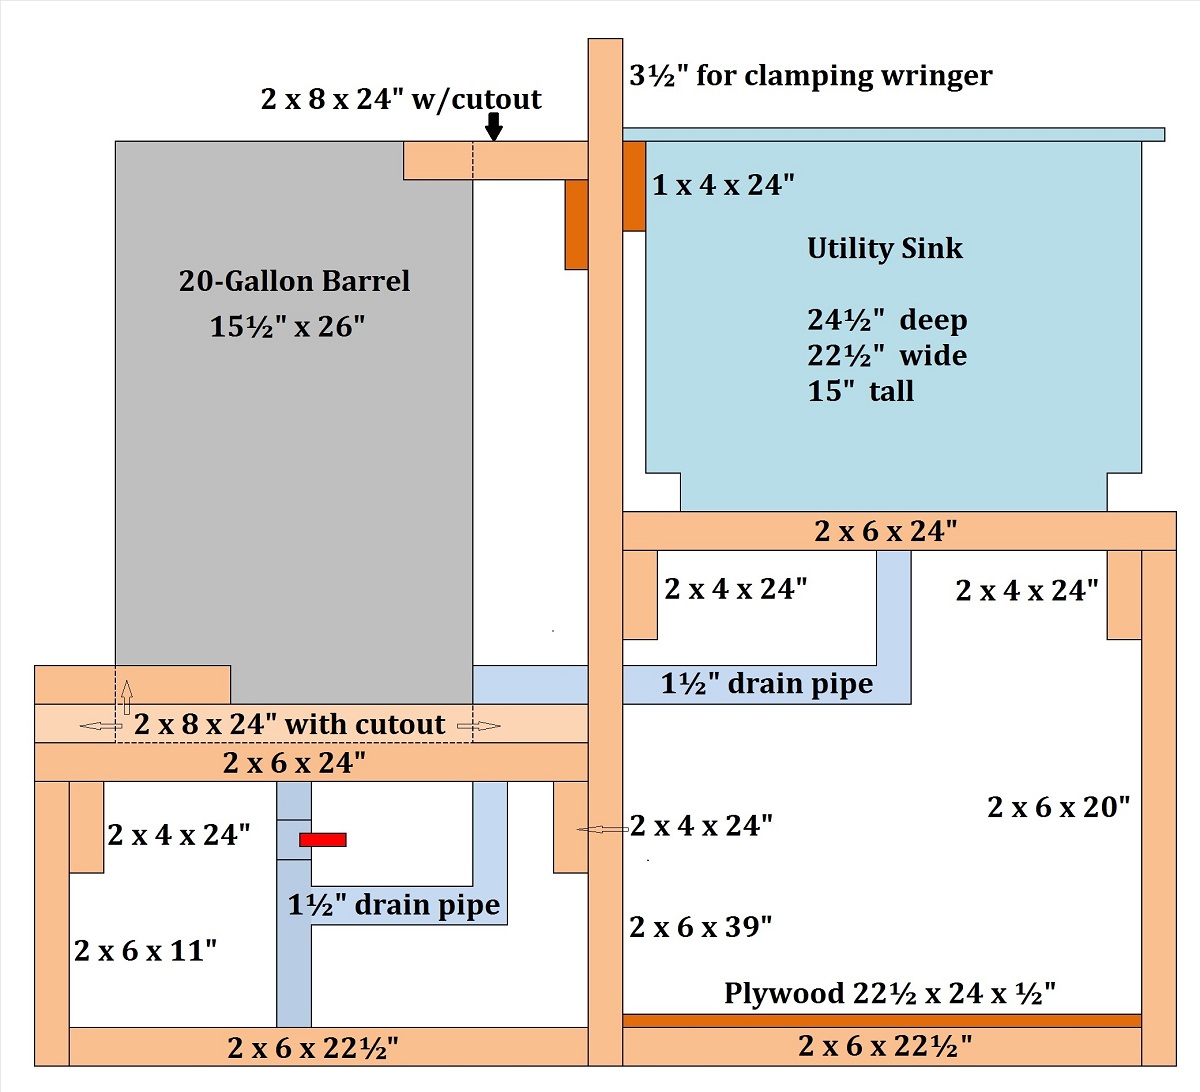
I drew my blueprints in Excel and designed a wooden stand of treated lumber that holds a plastic laundry sink on the right side and my wash barrel on the left, separated by tall divider to attach the wringer to as seen in Photo 2.
Back in Great Grandma’s day, washtubs were used but I avoided those for two reasons. First, I wanted to be able to drain the water into a gray-water plumbing system via a hole in the bottom of the barrel and the sink. Secondly, the basic laws of physics told me that as I plunged, I’d have more water flowing through the clothes in a tall narrow receptacle as opposed to a wide shallow one which allows more water to move to the sides instead of through the clothes. I chose a 20-gallon plastic barrel, 15½” wide and 26” tall, to give me a tall column of water and in practice has performed as expected, moving a lot of water through the clothes.
The wash barrel and the sink each have their own set of hot- and cold-water taps, threaded for hose attachments to give them more diversity and usability. On the wash barrel cold-water faucet, I attached a short piece of garden hose that reaches not quite to the bottom of the barrel. This keeps water from spraying everything in the vicinity when filling the barrel and with the water entering at the bottom, less soap foam is created.
I won’t go into the tedious details of the actual construction, but Photo 3 shows the blueprint I used which should be easy enough to follow. The dotted lines below the barrel show where the barrel is hidden behind the wood and the cutouts referred to in the blueprint can be seen and understood more clearly in the photo above. There are other ways to accomplish the same thing, holding the barrel steady, without going to the trouble of making cutouts.
I made two changes to the blueprint which don’t match my real-life washer. First, I replaced the bathtub-style lever-operated drain plug in the bottom of the barrel with a larger PVC valve to help the water drain more quickly. A simple rubber stopper doesn’t work because it gets sucked out as the clothes are plunged. Regardless of the plug style, a hole must be drilled into the bottom of the barrel to accommodate the drain system which in my case, is tied together with the sink on the right side of the stand. Use the largest valve you can afford to help compensate for wet clothes blocking the drain at the bottom of the barrel.
The blueprint also doesn’t show the slanting board at the top (as seen in the photo), to the left of the wringer. Its main purpose is to keep water from slopping onto the floor as the clothes are moved from the barrel and fed into the wringer. Once you have the stand completed and the wringer attached, you can figure out the best way to accomplish the task if you find it necessary. In hindsight, I would have used a 1 x 12 x 24” at a shallower angle.
USING THE WASHING SYSTEM
You’ll quickly develop your own technique but for a starting point, here’s how I wash clothes in mine.
I begin by closing the drain at the bottom of the barrel and turning on the water. Once I have 4-5” of water in the barrel I add laundry detergent (any kind will work) then plunge it briefly to mix it in and be sure there’s not a blob of detergent sitting on the bottom.
When the barrel is about half full, I shut off the water and begin putting laundry in, plunging every now and then to help speed up the process of getting complete saturation with water. I then spend about five minutes plunging to get the soap worked into the material. After five minutes, I leave everything to soak while the soap continues to break down any hard-to-clean dirt and grease picked up while working around the homestead. I take a rest (it’s a pretty good workout) and go do something else for 15 or 20 minutes, then return and plunge for another five minutes. On a load that may have some particularly grimy denims, I let the load rest once more before plunging it a third time.
Once I’m sure everything’s clean, I drain the water. Since there’s no spin cycle, it takes longer for the water to gravity drain out of the clothes. Once the drainage has slowed considerably, I close the valve and fill the barrel with rinse water. The more wash water you drain away, the less soap there’ll be in the first rinse water. After filling the barrel halfway, I spend a few minutes plunging, then drain the rinse water. Experience will tell you how many rinse cycles you need. Heavy jeans and towels typically require three rinses, while sheets and t-shirts generally get two.
Once the rinse cycles are complete, I drain the water for the last time and leave the drain open. Next, I feed clothes one item at a time into the wringer, hand cranking as I go. I typically adjust the wringer pressure for the heavy denims first, then adjust it once more for everything else. The wringer is not difficult to turn and does a great job of getting the water out. Without a wringer, it’s hard on your hands to manually wring a week’s worth of laundry and you can’t remove as much water, slowing down the drying time. Even the hand wringer will leave more water in your clothes than an electric washing machine so they’ll to take longer to dry on the line. You may need to get up with the chickens on those days which are more humid, colder, or less windy than on optimal days. I only rarely have a load of clothes not dry in a single day, generally during the shorter days of winter when it’s overcast, so I finish drying them indoors by the woodstove.
CONCLUSION
This manual clothes-washing system sounds like a lot of work but like everything else in a self-reliant and post-TEOTWAWKI world, once you get the hang of it, it’s just another routine that you won’t give a second thought to.
Washing clothes manually post-SHTF will probably be something only a small minority of people will be adequately prepared for. Without a “breathing mobile washer” and a hand-crank wringer it’s going to be a real pain for most. On top of all the other manual labor people had to do in the old days, washing clothes was a time-consuming chore so they wore their clothes for longer periods between washings. Most of us will be doing the same but eventually we’ll have to wash them.
Most people can’t justify the cost to build a system like this anytime soon but it’s one more thing to keep on your buy list if things start to get dicey and it looks like we’re headed over the waterfall.
Based on my own experience the most essential part of a manual system is the hand-crank wringer. An inferior but workable plunger can be made from wood or metal. Many different kinds of wash tubs, barrels, or buckets could be used to hold the water. But the wringer is difficult to DIY and will do the most for speeding up clothes-drying time and for preventing long-term [repetitive stress] problems with your hands.
I finally quit using my TEOTWAWKI clothes-washing system when my hand arthritis got worse but I lived my preps for three and a half years and learned that it will get me through TEOTWAWKI much better than any other type of clothes-washing system I‘ve seen in my travels. I can also run my electric washing machine directly off my solar panels so until that wears out, I won’t have to resort to my manual system unless I have a long succession of cloudy days. As always, two is one and one is none so whatever happens, I’m well prepared.
I hope you are too.
No comments:
Post a Comment