
Repurposing containers is one of my favorite things to do. Some people may give little thought to this idea which seems a little odd to me because when we purchase a product, we also buy everything that comes with it, including the container.
I have repurposed all sorts of containers from coffee cans, soup cans, to plastic bottles.
Years ago, I was fascinated by how people were reusing plastic bottles. They have been used to create floatation devices, rafts, and as building materials in homes; just to name a few.
Seeing that plastic bottles are thrown away in mass and can be found floating around everywhere in nature, it is no wonder people are figuring out creative ways to reuse them. Some of these projects appeared straightforward forward while others were quite ingenious.
Related: 15 Survival Uses for Plastic Bottles
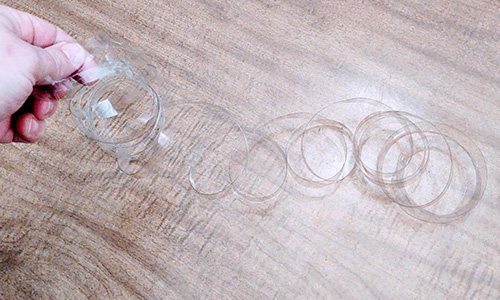
One of the cleverest projects I came across was taking a plastic bottle and turning it into cordage.
I love the outdoors, and everything related to self-reliance, survival, and emergency preparedness. And just like others with the same interest, one of the top gear items we like to have is cordage. This is because it is incredibly versatile and useful to have.
Now, some types of cordages are affordable while other types can be rather expensive. And then there is cordage that can be made from natural materials which are about as cheap as you can get, though it can be a time-consuming process.
Another option though is making cordage from a plastic bottle that would otherwise be thrown away. This can be done at home quickly with the proper setup or done in the field should you find yourself without cordage.
But before I get into the methods for making this cordage, it is important to pick the right type of plastic bottle.
Choosing the Right Bottle
Choosing the right kind of plastic bottle will result in more durable cordage.
The plastic that is used in larger bottles, such as one or two-liter soda/water bottles is preferred for two reasons. The plastic is slightly thicker and smooth throughout most of the bottle. This means more cordage can be made and it will be stronger.
The bottles to stay away from are the small ones that make a crinkling sound when they are squeezed. That crinkling sound indicates that the plastic is very thin and therefore can tear easily. If this is the only bottle at your disposal it can be used, just do not expect it to hold up well.
Bottles that have a lot of indentations or curves are difficult to use as well because their shapes make it difficult to make one continuous cut.
How Much Cordage to Expect
The bottle I used in the first method was a one-liter water bottle and I was able to get roughly twelve feet of cordage.
 When I have done this before with a two-liter bottle I was able to produce almost thirty feet of cordage.
The above two lengths are good estimates of what to expect to get out of a one and two-liter bottle. However, keep in mind that the length may be less or more depending on the width of cordage that is cut.
3 Ways to Make Plastic Cordage
There are several different ways in which this cordage can be made but I will be concentrating on the three methods I have used. I will start with the simplest way first followed by more involved setups.
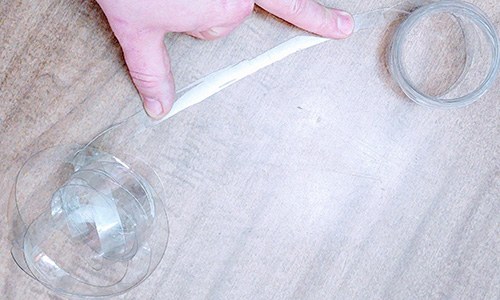
Scissors Method
What You Will Need:
- A plastic bottle
- A pair of scissors
If you find yourself away from a workshop with limited tools, this may be the method for you as it only requires the use of a pair of scissors.
Instructions:
#1. Use the scissors to puncture a hole towards the bottom of the bottle.
To obtain the most cordage as possible, create a hole at the lowest point on the bottle before the bottom begins to curve inward.
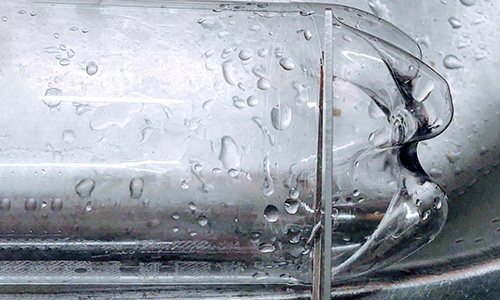
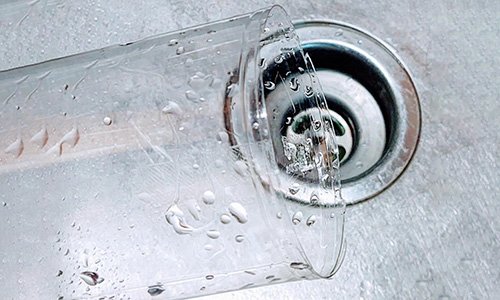
#2. Insert the scissors into the hole and cut the bottom of the bottle away from the bottle. Try to cut as even as possible, but if you cannot then do not worry about it.
Discard the bottom or use it for another project because you will not be needing it any further for making cordage.
 #3. On the section of the bottle where the bottom was removed, use the scissors to make a cut that is slightly angled towards the top of the bottle. This is just an initial cut for starting the cordage.
The degree of the angle is going to be dependent on the thickness of the desired cordage.
For thinner cordage, make the angle shallow. For thicker cordage make the angle more extreme.
#4. After the start cut has been made position the scissors so that they are parallel to the bottom of the bottle and begin cutting across the bottle.
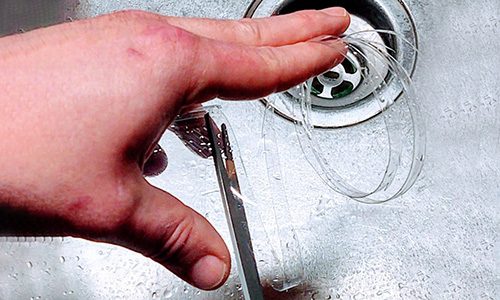 #5. The goal is to create one continuous cut to produce the longest piece of cordage possible. This process certainly takes a little bit of practice and time but after a few bottles, it is not difficult to get the hang of.
 Stick Jig
Materials:
- A round stick or piece of wood
- A sharp knife
- A wood saw
To start, since a knife and wood saw is needed, I think a Swiss Army Knife works very well for this project. However, you can use whatever tools you prefer or what is available.
I first learned this method several years ago from Caveman Cody, who has a very interesting YouTube channel. The original video for this project can be seen here.
Guidelines:
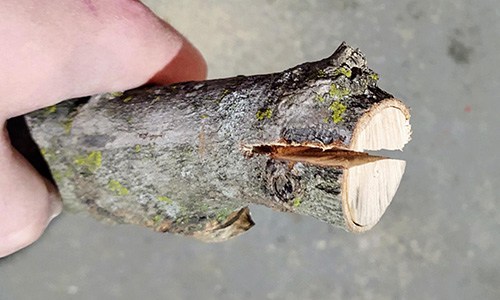
Step 1: Find a piece of wood that is several inches in diameter. This project is easier if you can find this piece of wood still attached to a log or downed tree because the log will act like a vice and help to hold the jig.
But if the latter is not available a branch will work just fine.
Step 2: With the piece of wood standing upright, place the wood saw on the end of the branch and in the middle make a cut that is about two inches deep.
 Step 3: With the wood saw in hand, make another cut that is at the bottom of the first cut and perpendicular to the branch.
This cut only needs to go about halfway through the wood.
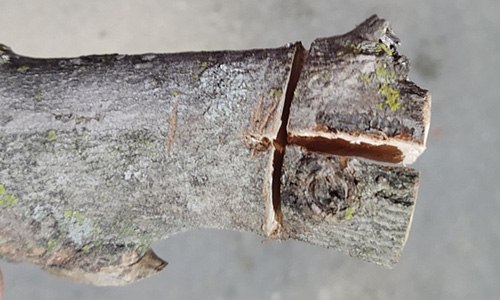 Step 4: Next, one of the corners on the end of the branch needs to be knocked out. Use the wood saw, or a knife to baton cut a corner of the wood out that is on the side of the branch with the perpendicular cut.
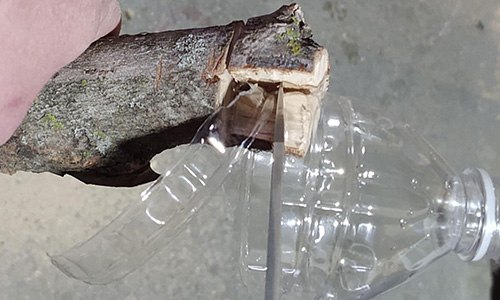
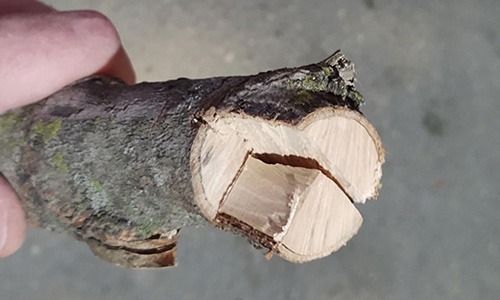 Step 5: This jig is now complete and can be used. Prepare a plastic bottle by using the knife to cut the bottom off.
Step 6: Push the tip of the knife firmly into the area where the first cut was made and above the second cut. It may help to hold the knife in place by lightly hammering it in with another piece of wood. The knife blade needs to be perpendicular to the first cut.
The space between the bottom of the blade and the bottom of the first cut will be the guide for how thick the cordage will be.
For thicker cordage place the knife blade high up on the jig. For thinner cordage place the knife blade lower on the jig.
Step 7: Place the opened bottom of the plastic bottle onto the jig so that the wall of the bottle is in between the wood of the first cut.
Step 8: Turn the bottle against the knife blade to create the initial cut. It may take a few attempts, but the blade will eventually catch the plastic.
Continue turning the bottle until a small tab of plastic has been pushed under and past the blade.
Step 9: Once the plastic tab is through, you can start pulling it through to create the cordage.
 Wood Jig
What You Will Need:
- A flat piece of wood
- Razorblade
- Wood Saw
- 2 Clamps
There are a lot of different homemade jigs like this project and some of them require several tools and hardware to complete.
I somehow lost my previous jig that was based on a more complex setup. So I decided to show the following jig because it is the simplest version, meaning less tools or hardware.
Also, it helps if the thickness of the piece of wood being used is at least that of the height of the razor blade.
Instructions:
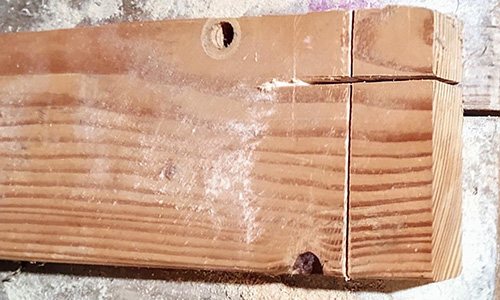
#1. Using the wood saw you are going to need to create two cuts.
The first cut needs to be parallel to the wood and about one to two inches from the side of the board. The length of the cut only needs to be several inches long, but the cut needs to be all way through the wood.
The second cut is going to be perpendicular to the first cut and roughly two inches from the end. Do not cut all the way through the wood.
Ideally, the depth of the second cut will match the height of the razor blade.
Lastly, where these two cuts intersect is where the razorblade is going to be cutting the plastic. So, the distance past this point of open wood from the first cut is going to determine how wide the cordage will be cut.
#2. The razor blade can now be dropped into the perpendicular cut. Since this cut did not go all the way through the wood the razor blade should rest nicely inside.
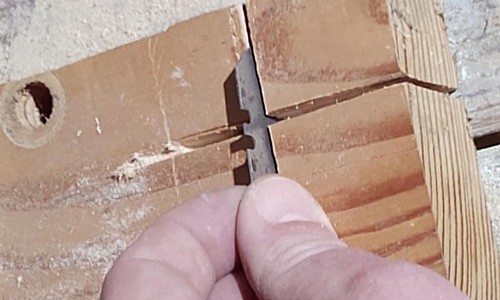 #3. Position a clamp onto the wood so that it will be holding the razor blade. The jig is now ready to be used.
If the wood is too thick and the second cut too deep, then the clamp will not hold the razor blade down and it will move around when the bottle is turned against it.
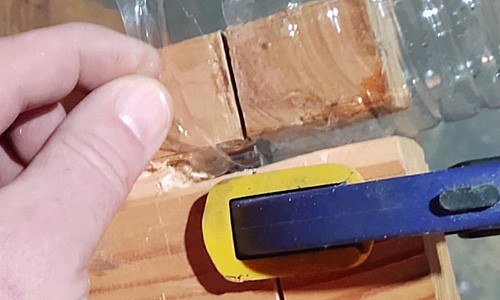
#4. Prepare a water bottle by using a cutting tool to remove the bottom. The bottom can be discarded.
#5. Slide the sidewall of the plastic bottle into the first parallel cut into the wood and begin turning the bottle until the plastic catches the cutting edge of the razor blade.
#6. Once the razor blade has cut into the plastic, keep turning the bottle until the plastic tab emerges on the backside of the blade.
This tab can now be pulled out with a pair of pliers or by using your hands and it should produce a continuous strand of cordage.
 Reasons for Making Plastic Cordage
I have seen and heard many negative comments regarding this project. The two main opinions being, “why not just go buy some cordage?” and “I hope you have a bunch of tools or hardware to do this in a survival situation.”
The answers to the above questions are straightforward, at least in my opinion.
Sure, I can go out and buy cordage and have done so a lot. But the purpose of this project is to slow down our throw-away society and learn to reuse items by thinking outside of the box, to provide “free” cordage, and to show a way for making cordage when the only tools available are a plastic bottle and a cutting tool.
I pretty much addressed the second comment in the last part of the previous answer. The first two methods for making this cordage require minimum tools that most outdoorsmen have on them. The third method, depending on the type of jig created, does require more tools or hardware to create.
But this type of jig is meant to be used more at home when a person wishes to make a lot of plastic cordage. Obviously the last jig is not a survival go to method.
Related: How To Catch Fish With A Bottle
Practical Uses
You may be wondering, “what am I going to use this stuff for?” Well, the short answer is that it can be used in many of the same ways that regular cordage is used, but it will not turn or twist as easily.
However, this plastic cordage is quite strong and can be used in a variety of ways.
One thing I have yet to try is heating the cordage after it has been used. This applies mainly to items that need to be lashed together.
Once the cordage has been wrapped around two poles, for example, a heat source can be used to shrink the plastic and thereby tightening its hold. One method I have heard of is to pour boiling water over the plastic lashings.
Here are a few ideas on how to use plastic cordage that will get you going.
- Fishing line
- Bag sling
- Rifle sling
- Making a raft
- Lashing poles together
- Tie downs
- Creating a shelter
- Making furniture
- Use it to pull supplies
- Really, the only limit to this list is your imagination.
Wrap Up
I think this is a pretty cool DIY project, but I have to admit that I am still finding my stride when it comes to the different widths of cordage and what I want to use them for.
There does not seem to be an end in sight to the manufacturing of plastic bottles which means there is ample opportunity to reuse them in a multitude of different ways.
Whether you find yourself stuck in the middle of nowhere and in need of cordage or want to make some at home, you now know three different ways to make trash into cordage.
Thanks for reading and stay prepared.
No comments:
Post a Comment