Original Article:
By M. I. Grey
As I get older, I reflect more and more on the generations that came before me and my family. Every fall, I send my father a picture of the four tons of wood pellets I’ve loaded into the garage and the canning that we completed over the year.
My grandmother was a practical woman. It has been said that she was happiest two days a year: the day they filled the coal bin, and the day they completed the canning.

A full coal bin guaranteed that her family would be warm throughout the winter. A cupboard filled with jars ensured they wouldn’t go hungry.
This sentiment resonates with me in this unbalanced world. That’s one reason I enjoy canning. It places my family’s food security where it belongs. In our own hands.
Let’s look at the various concerns associated with preserving food in glass jars.
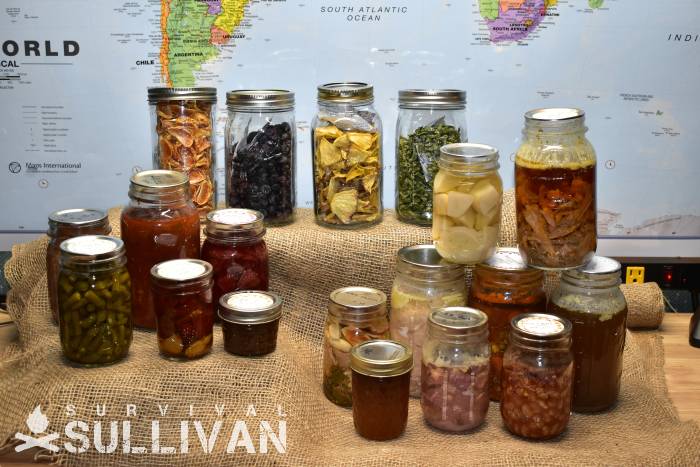
A collection of glass jar storage. Top: Dehydrated, Left: Water Bath Canned, Right: Pressure Canned.Secrets of Storage
All food storage starts with enemies. To safely store food, regardless of the method, you need to fight spoilage.
Depending on what and how you are preserving food in glass jars, you need to combat oxygen, moisture, improper pH, and light. The good news is that for each glass jar preservation method, there are generations of research and tradition available to guide you.
The good news is that glass jars have all the advantages for food preservation.
The first is oxygen. Oxygen combines with oils and fats to turn them rancid and oxidizes everything else. All canning methods we discuss minimize exposure to air and seal it out.
Glass jars are durable and impervious to oxygen exchange. The rings and lids used with glass gars form an air-tight seal.
Moisture is the realm of dehydrated goods. If your canned goods aren’t swimming in brine, they need to be dry. When you package them dry, the lids and rings keep them that way.
You can also add desiccant packages to clean up what moisture is left. Again, glass jars seal out moisture and keep the contents dry.
Where liquids are involved is where pH takes over. A sealed jar is a private little biosphere. Your goal however is not to allow the little critters to thrive. You want everything dead.
A properly acidic environment kills off any critters that will cause you a world of hurt. Glass jars are neutral containers that are resilient to high acid and salty contents.
Light is easy. Over time, it eats away at flavor and nutrition. Keep jars in a dark place, and you’re all set. The other alternative is to select a dark brown or dark blue jar. These block light naturally.
Next is durability. Glass jars are strong. You can stack them several layers deep without concerns of them crushing. Treated properly, they last for generations.
Most of the jars I use have been passed down. I’m the third generation to rely on them for my food storage. Once sealed up, they are impervious to critters and insects.
Speaking of flavor and nutrition, I left one out. Not exactly affected by canning, but you need to monitor storage temperature. Keep them cool.
So, with this bit of knowledge, let’s get to it!
Selecting Glass Jars
Are all glass jars created equal? Like anything in prepping, you must select the right tool for the job. Glass jars are numerous, easy to find, relatively inexpensive, and last forever.
Depending on if you are using them for canning, or just simple storage, be sure you are using the right jars.
If you are using jars for water bath or pressure canning, you need to make sure you are using the correct jars. Jars made for decorative purposes will not survive the canning process and may break in the canner or when you are using them.
You can purchase jars specifically made for canning from manufacturers such as Ball, Mason, and Kerr. While these are the most well-known, there are others.
Manufactures such as Encheng, Komota makes glass jars, however, they are mostly advertised for decorative purposes and not canning.
Next is jar size. Most common standard mason-style jars come in three sizes. Quarts and pints are the most common. Next are jelly jars.
These jars are half-pint that store a volume of one cup. Larger jars, half-gallon, and 1 gallon, are also available but rarely used in water bath or pressure canning.
The larger jars have their uses, though. They are perfect for small batches of pickled vegetables and lacto-fermentation.
You do not need to use jars made for canning for these options. As long as they hold liquid, you are all set. You don’t even need a good lid. A layer of plastic wrap and a rubber band are all you need.
Water Bath Canning Food Storage
Water bath canning is the most popular canning method because it’s easy. Big pot, a few jars, and a few minor tools, and you’re off and running. Use water bath canning for acidic foods that aren’t too dense.

Some of my water bath cans of food. Top: fiddleheads, hot peppers, middle: apple pie filling, strawberry pie filling, rhubarb butter, dill beans, bottom: chicken of the woods mushrooms, applesauce, pineapple jam, tomato sauce.
Water bath canned foods include fruits, some vegetables, and a few sauces. Mom’s apple sauce and pie filling, and grandma’s tomato sauce are some of the most popular canned foods.
In our household, we also can many jellies, jams, dill beans, and hot peppers. When foraging, I gather extra mushrooms and fiddleheads to can.
Being widely popular, there are too many recipes to count. The good news is, regardless of the recipe, the process is pretty much the same. Add food into the jar, clean the rim, pop on the lid, finger tighten, and boil.
If the dome has pulled down, then you can remove the ring, label the jar, and add it to your stash. Water bath jars are good for a minimum of 1 year, although I have eaten several jars that have 3+ years of shelf time.
The first batch you do may make you a little nervous, but after a few batches, you’ll be handling it like grandma.

Canning Tools. Left to Right: Funnel, Rings, Pint Jars, Jar lifter, Magnetic Lid Lifter, Lids
There is a bit of equipment required for water bath canning. A canner, jars and lids, and a few tools. Luckily, you can use everything, except the canner, for pressure canning.
Pressure Canning
Where water bath canning is not applicable, we turn to pressure canning. Meats, low acid fruits and vegetables, soups, and stews can all be preserved with a pressure canner.
Pressure canners increase temperatures to about 245 degrees F (118 C). The extra temperature kills off critters that water bath canning cannot.

Some of my pressure canned food. Top: beans, potatoes, baked beans, middle: chicken, corned beef, pork, bottom: ham and bean soup, chicken soup, beef vegetable soup, laying down: chicken stock.
Pressure canners can intimidate. I know more people that avoid pressure canners than those that use them. The stories of grandma’s kitchen exploding, or some homesteader whose canner went off like a bomb are enough to keep most people away.
Modern canners all have several safety features that keep accidents to a minimum. So can with confidence!
I pressure can meats and stews. It’s the best way to stock up on protein. Raw packed chicken breast and pork loin are two of the cheapest ways to put pounds and pounds of protein in the pantry.
Just like water bath canning, you fill your jar, clean the lid, cap them off, and can. Pressure canning is a longer process and has a few extra steps compared to water bath canning.
Once you have met the time requirement, kill the heat and let it cool. You can’t release the pressure until it has come back down below 212 degrees F (100 C). Otherwise, the jars will have too much pressure, and may potentially explode.
When I run a batch of jars, the full cycle takes about three hours. So be patient!
Now, while water bath and pressure canning dominate the food storage world, other methods use glass jars to keep your pantry full.
Pickling and Lacto-Fermentation
I’m not sure about your grandmother, but mine made the best pickles I’ve ever had. My dad took up the mantle and has made sauerkraut for over 25 years. If you haven’t tried pickling or Lacto-Fermentation, you are in for a treat.
Pickling and fermentation are the same processes. With a little salt, you inhibit bad bacteria and allow good bacteria to flourish.
Lactobacillus bacteria convert natural sugars to acid. The resulting lactic acid is a natural preservative. Cucumbers, cabbage, carrots, cauliflower, are the most frequently preserved vegetables.
The fermentation process is as simple as it is tasty.
Pack your vegetables into your glass jar.
Add a few flavorings such as dill, garlic, and dried hot peppers.
Cover the vegetables with a brine made from 8 cups of water, and 3 tablespoons canning salt. As you need more brine, just mix up another batch. Just keep the ratios the same.
Cover with a loose lid or plastic wrap and let it sit. You can also use an airlock or a lid. If using a lid, loosen it and burp it every day.
Leave the jar at room temperature for 3-5 days.
After that, keep it in the fridge in your glass jar. It’ll be good for several weeks.
Glass Jars in the Freezer
If you have ample freezer space, you can even your glass jars there. This applies to sauces, jams, broth, and soups.
Glass jars are great for the freezer, as long as you take a few cautions. Never fill a jar to the top and seal it before you freeze it. As the food and liquid expand, you could burst the jar. It’s often best to freeze without a lid. Once it’s frozen solid, then put on and tighten the lid.
Straight walled jars are best for the freezer. Where the neck tapers down, you can get fractures as everything freezes because of expansion. Speaking of fractures, never warm your jars in hot water. The thermal shock will shatter the jars. More on which glass jars are good for the freezer.
Bonus: Tinctures, and Flavorings
Glass jars aren’t just for food. They are also great for storing medicinals and flavorings.
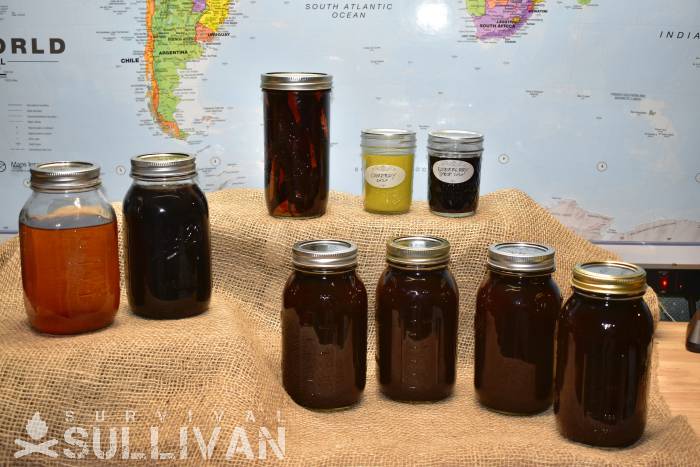
Top: Vanilla, Comfrey Salve, Elderberry Syrup, Left: Reishi Tincture, Elderberry Tincture, Bottom: Four quarts of Chaga Tincture. All in glass jars.
Over the years we have extended our knowledge to include wild foraged medicinals. My personal favorites are mushrooms and elderberries. Chaga, Reishi, and Bear’s Tooth are three of my favorite mushrooms to use in tinctures. Elderberries are similarly wonderful.
You don’t have to stop at tinctures! Elderberries make a great syrup when boiled, strained, and the liquid combined with honey. You can also make salves.
Don’t forget other flavorings. We just ventured into making vanilla extract. A few beans, some high-quality vodka, and a lot of time, and you have an extract that beats anything you can get in the grocery store.
For each of these, one of the most preferred storage methods is glass jars! Be they quarts, pints, jellies (half pints), or half-jellies (half cup), glass jars are perfect. Use the same lids and rings as all of your other canning methods to keep them safe.
Protecting Your Glass Jars
One of the biggest disadvantages of glass jars is their fragility. Drop one and it’s lost forever. Jars will last for generations, so it’s worth it to take care of them!
Moving glass jars can be a little unnerving. When I have to move over 4 at a time, I always reach for an old ball or Mason cardboard box made for quarts or pints. I’ve put too much time and effort into them to drop them down the stairs.
Always keep your old boxes. You can even purchase jar protector plastic cases.
Next are shelves. A case of quart jars can weigh up to 25 pounds. Most shelves can hold 4-8 cases. That is a significant amount of weight. Invest in sturdy shelves!
For those in earthquake zones, add proper bracing and rails around the edges around the shelves. If you get a little shake, these extra security precautions will keep every jar safe.
Closing up Glass Jars
Putting up food can be one of the most rewarding tasks in all of preparedness. You take relatively inexpensive food from the market and turn it into long-term storable meals.
Storing commercially canned chicken verse home-canned can cost you big dollars. When I see boneless chicken breast on sale, I stock up. These usually cost less than $1 per pound at the restaurant supply store.
One quart jar holds 2 pounds, and costs about 2 dollars. In comparison, the same amount of canned chicken from the grocery store costs me $8.
At those levels of savings, you can put up many, many times more meals than compared to commercially canned goods. The savings go up even more when you make comparisons to freeze-dried or MRE meals.
Glass jars are great for putting up that food. They are relatively inexpensive, widely available, and flexible. There’s no other container that supports dehydrating, water bath canning, and pressure canning.
Although a little confidence and skill are required, uncountable families for generations have relied on glass jars to feed them in the lean times.
Whether you are looking toward lean times, want to reduce waste out of the garden by preserving it, or wish to take advantage of bulk buys at the grocery store, get started now!
Canning with glass jars can do these for you. So, take advantage of glass jar preservation and fill up your shelves.
No comments:
Post a Comment