This article will look at how to build a panic room that will keep you alive when faced with deadly, human threats. This emphasis on human threats is what will distinguish a panic room from a safe room, the latter being a room for more general safety, namely natural disasters.
If it’s a more general safe room that you are interested in, see our comprehensive article on how to build a safe room in your home. That article can be seen as a sister article to this one, and you may very well find helpful information there for a safe room. There are, after all, many similarities between a safe room and a panic room, but here we will look at an original panic room design idea that you can use as a template to modify or build upon in your own home.
There is reason to be concerned about another threat, however – crime in the home. According to statistics, a home burglary occurs every 15 seconds in the United States, and 27.6% of those home burglaries occur when someone is home. This makes a solid case for building a panic room in your house.
Panic rooms have been around for a long time in one form or another. Kings and feudal lords had “keeps” in their castles that were fortified hideouts, occupied in times of danger. Humans have always recognized the need for a fall back position that will provide an impenetrable barrier between yourself and the threat.
But where in your house should you build a modern panic room? What are the design and structural requirements of panic rooms? The concept of a panic room is simple, but can become complicated. This article will take you through all the factors you need to consider. From location to construction materials and everything in between.
Panic Room Access – The Need for Speed
You will need to be able to lock yourself inside your safe room in no more than 10-30 seconds from the moment a threat is detected. There are ways to slow a burglar at your door, and you can even read an officer’s advice on home invasions, but there are plenty of reasons why you should still quick access to safety in the home.
In the case of a human threat, you will have the least amount of time – unless your security system or dogs warn you well in advance. Your panic room must be located in such a way that your attackers won’t end up between you and the safe room. If your home’s layout makes this impossible, consider multiple panic rooms.
In the case of natural forces and safe rooms, you should have a bit more time to access the room. Basements and garages are easily and quickly accessible. You can also locate a safe room outside your house, but a panic room should always go inside the home.
Where Should You Build Your Panic Room?
Natural disasters like a tornado’s or earthquake’s could have it tumble to the ground or blown across the county. Panic rooms in basements or outside could be susceptible to flooding. Depending on the location of your house, a ground floor panic room could also get flooded during a hurricane. All panic rooms inside a house could get buried under debris during a natural disaster.
These issues only matter with natural disasters, however, and that’s not what we’re concerned about in this article. We are concerned about the human threat, the burglar, violent ex-spouse, etc.
So, the first question to consider on how to build a panic room is where to build it. Here is my best recommendation for safe room locations: Build it where it can be accessed from insides room or family bathrooms.
Build it as far from entrances as possible, as this could give you maximum time to access the safe room. You could also consider multiple steel-lined closets, for physical safety during an attack.
Air Filtration
The vast majority of either safe or panic room designs out there focus almost entirely on wall construction while paying little attention to the actual air quality in the room, or – more specifically – the safety and supply of the air.
You can add another dimension of safety (and use) to your panic room by incorporating an air filtration system. Unfortunately, this is going to be something that will be difficult to construct on your own. It’s an area where you are likely going to have to spend some money.
The best type of air filtration you can have for a panic room will include nuclear, biological, and chemical (NBC) protection. The graphic below from one manufacturer, Castellex, incorporates panic rooms as a key market for their NBC air filtration systems.
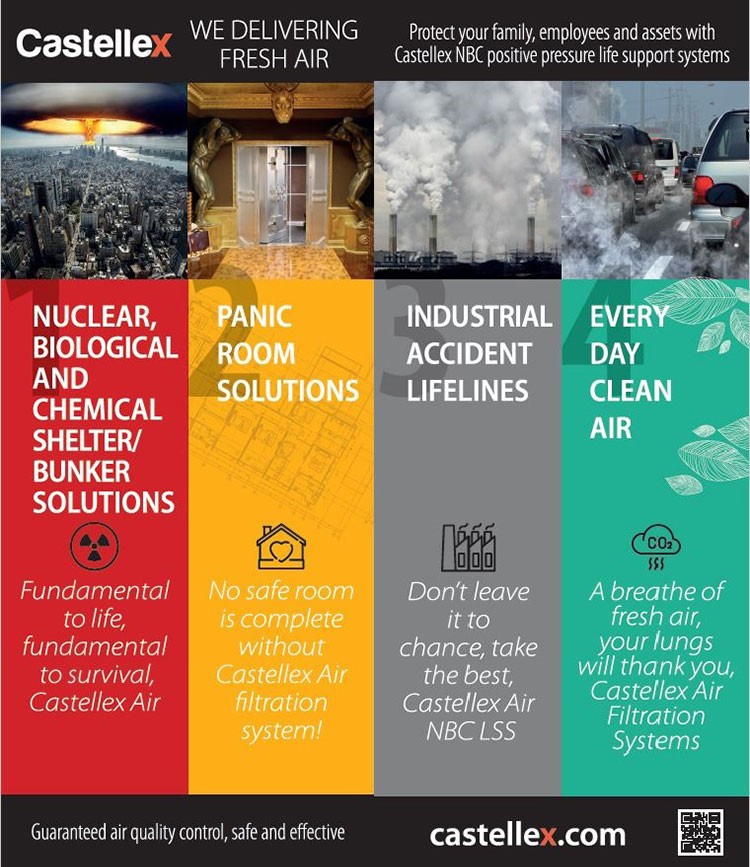
They write even write about their systems from the view of preppers, posing the question: SHTF Are You Ready? There they talk underscore the “rule of threes” that most preppers should already be familiar with:
- You can last three weeks without food.
- You can last three days without water.
- You can last three minutes without clean, breathable air.
In other words, storing food and water for an extended stay in a panic room will mean nothing if the air isn’t clean.
From Castellex:
They have a variety of systems to meet different needs, from domestic to commercial. They offer user-friendly units that are (relatively) easy to install for anyone somewhat handy. Prices vary accordingly, but like with all things, you get what you pay for.
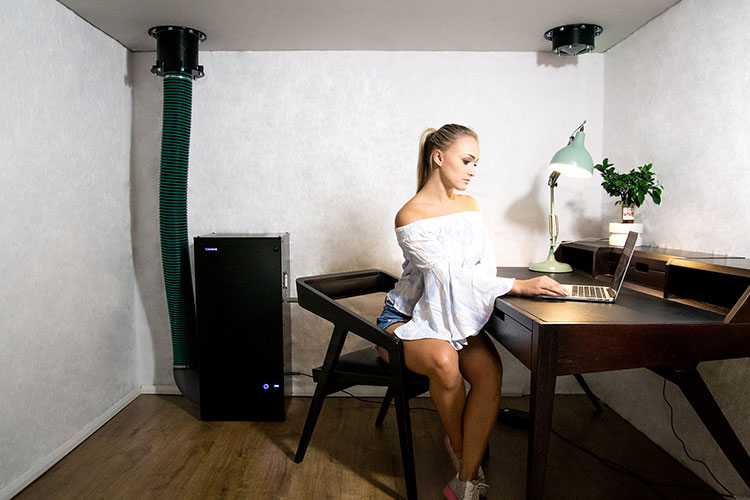
Piping a consistent, clean air supply into your panic room will greatly extend the amount of time you can spend inside, critical if your panic room will also function as a safe room or fallout shelter.
Panic Room Design Ideas
There are many commercially available safe rooms that can double as panic rooms, and many of the companies offering them have both top notch protection and high prices. So, if you want to build a panic room yourself, this is a great starter article.
I am going to be sharing two ideas for creating safe rooms in your current house. Covering the pros and cons for each option. Both suggestions are for protection against human attackers but should provide a level of protection against other threats.
Build a Masonry Room with Steel Ceiling
Turn an entire room into a panic room. This is an ideal option for a brick built house. Using the smallest room available will save time and cost.
A panic room is an impenetrable room that cannot be accessed from any direction. A room in a brick house already has a concrete floor and brick walls. You just need to take care of the ceiling, the door and the windows.
The door is simple. You can install a commercially available safe room door that is fire and bulletproof. Bulletproof glass and specialty window frames with bullet proof glass can also be purchased. You can also create your own solution, by fortifying a door with a steel plate, or installing bulletproof glass in existing frames. I would double up on steel for the door, as this would be the most likely point of attack.
Installing a steel ceiling will keep attackers out while providing protection from gunfire. We tested the AR550 body armor, and the results were impressive! However, steel of that type may be cost-prohibitive for much larger applications such as this.
Consider 3/16″ thick mild steel plate to protect against a 9mm round. A round fired from a perfectly 90 degree angle may penetrate, but at greatly reduced velocity.
If you are concerned about stopping a 5.56 round, the recommendation is to use AR500 type steel in 3/8″ thickness. Note that AR500 requires specialized welding techniques, so I would recommend bolting the plates as an alternative.
Some recommendations are for 1″inch thick mild steel plate to stop a .223 or 5.56. This would be too heavy for a ceiling, as a single plate would be close to 1 ton. I don’t see an attacker standing steel firing a round directly between his feet to get the best 90-degree angle penetration. A ricochet could kill him. I would use the lighter and thinner options.
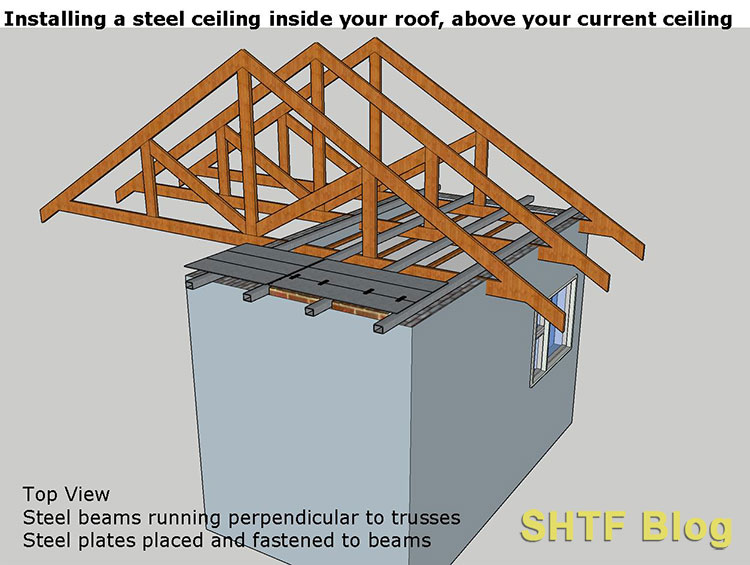
Installing the steel plate without removing your current ceiling will reduce labor and cost. You will need to create a frame on which to lay your steel sheets. If it’s a big room, you may need someone with structural experience to recommend steel beam sizes.
Follow these steps:
Step 1
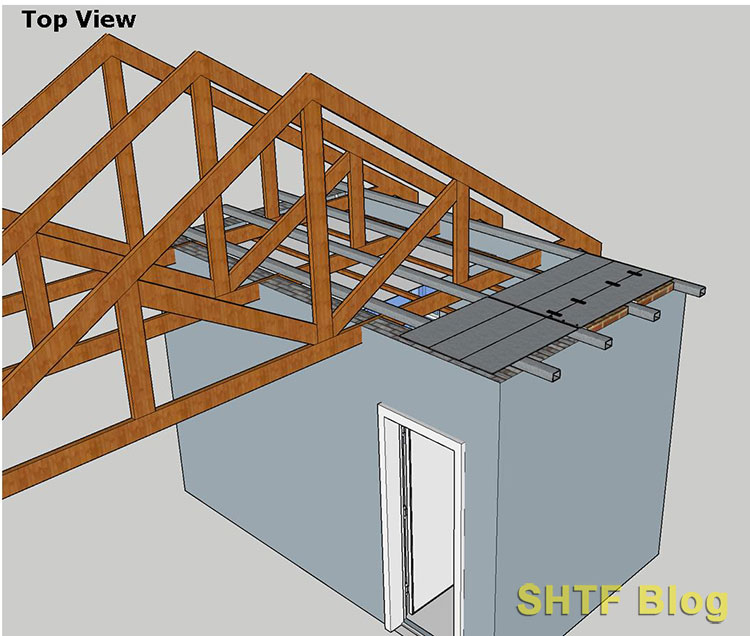
Use steel u-channel or lip channel, open side down, perpendicular to your rafters or trusses. The steel beams can lay on the rafters, but will need to be supported mainly by the brick walls. You may need to raise your walls a brick or two to accomplish this.
Step 2
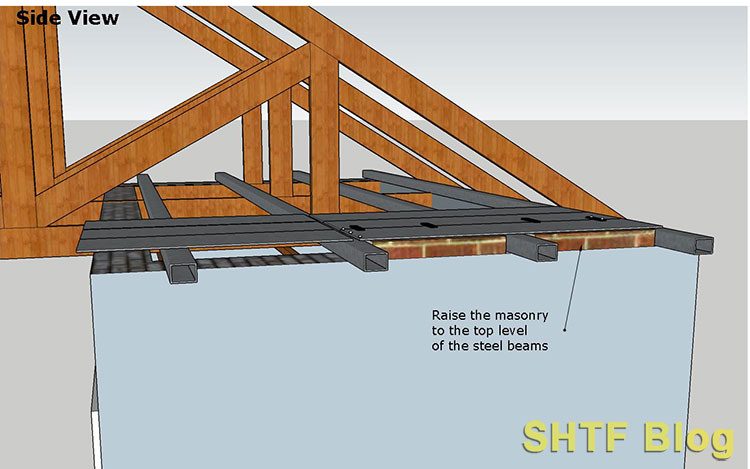
Raise your masonry to the upper level of the steel supports. This is to prevent shots being fired into the room from the side.
Step 3
Place your steel plates over the steel beams. These are not going to expand/contract, so place them end to end and side to side with no gaps.
Step 4
Weld or bolt into the steel plates into place.
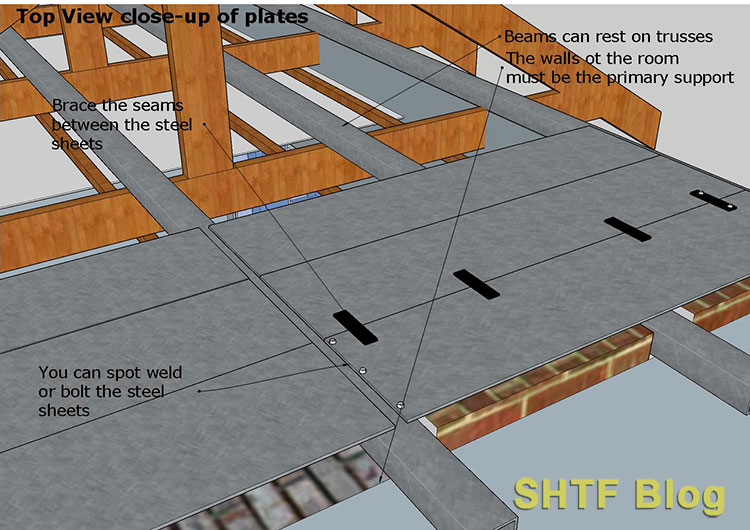
Only weld where the two sheets overlap on the channel. If you’re bolting it down, ruin the heads of the bolts once they’re tight so the can’t be loosened again. You can use small braces to bolt along seams.
Pros and Cons of This Design
It’s an easy option to install in an existing building, and it can be accomplished in a relatively short amount of time. Protection is mainly against human attackers. A window would allow you a possible escape route. Choosing a bathroom provides access to water and sanitation during the ordeal. If this is on a ground floor, it should offer a measure of protection against tornado’s and hurricanes.
The downside to this is that a highly motivated attacker (think crazed ex-spouse) could demolish a hole through a masonry wall. That would take a bit of time, however, and most would-be criminals do not want to hang around for long. Also, the room will offer resistance to natural disasters and fires. A fire can enter by way of the rafters and set the ceiling inside the room alight.
Build a Steel Cage Room
In a wooden framed or drywall house, one option is to build a steel cage panic room. You can follow the same guidelines as above for choosing your plate thickness. I would recommend building a steel frame first, and then installing the steel plate. The door and window frame need to be part of your steel frame.
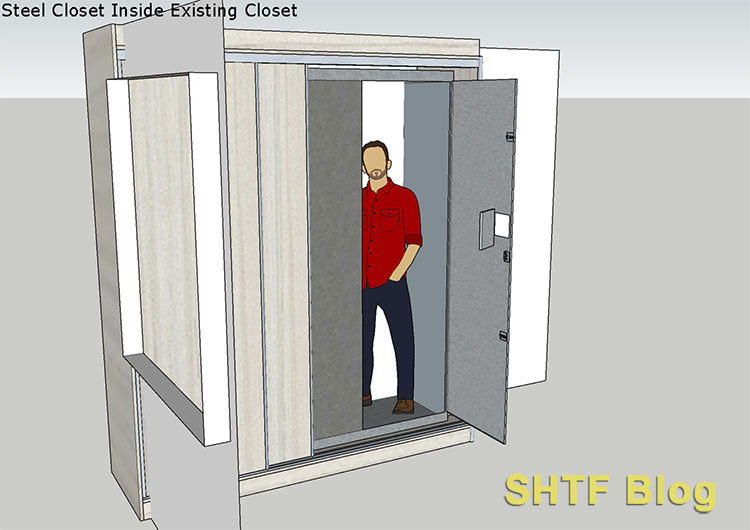
If your goal is to be safe for a short period while you wait for help to arrive, you can even do this inside a closet. You need 9 square feet of floor space per person you want to fit in. That will also allow a few hours of air, although it’s highly recommended to have ventilation.
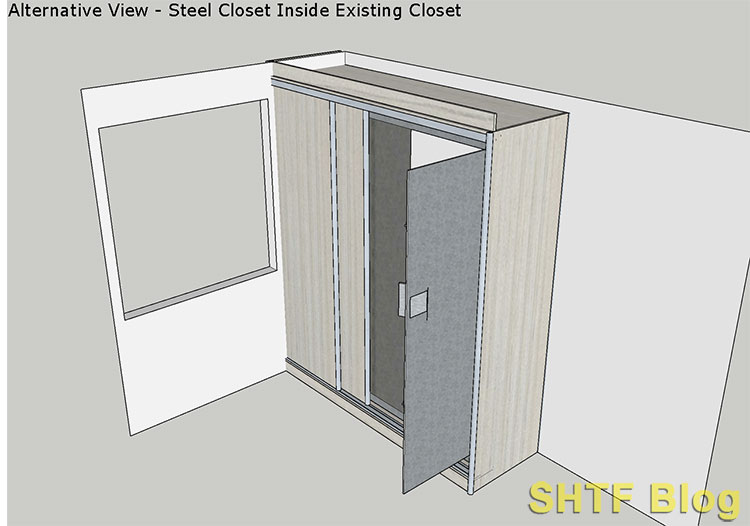
A steel cage in a closet is really just a short term solution, and your whole-event strategy must include calling for assistance. An alarm panic button inside the room is ideal for this.
Pros and Cons of This Design
The closet option will provide bodily safety during an attack. It’s a low-cost, short-term solution. Converting an entire room will be quite a project, but still less invasive than casting concrete.
Both options are breachable. You will have to call for assistance or be ready to defend your position. If the motive for the attack is robbery or theft, these are great options. If the motive is to grab hold of you or your family members, this will only give you time to implement a second plan.
Panic Room Materials
Panic rooms have to be impenetrable and virtually indestructible. The walls, roof, and floor need to be made of reinforced concrete, steel plate, or a combination of both.
Steel Plate
Steel plate is heavy. The thicker you go, the more complicated handling will be. You can cut it into strips to lug into the ceiling. Try working with sections below 220 pounds per unit. Two strong people can handle that kind of weight.
You absolutely must know how much the beams can carry for weight. You may have to consult a structural engineer or professional builder for this. This is essential to knowing how to build a panic room. Retreating to the safety of a panic room only to have it cave in on top of you due to weight from steel plates won’t offer much in the way of safety.
I would recommend removing a section of ceiling in an adjacent room to ease the process. You can also use multiple layers of thinner materials. If you have no construction and safe work practice experience, you best call in some advice.
Ceiling, Door, and Window
It is recommended to use sound insulation, this could provide psychological comfort from noises or threats.
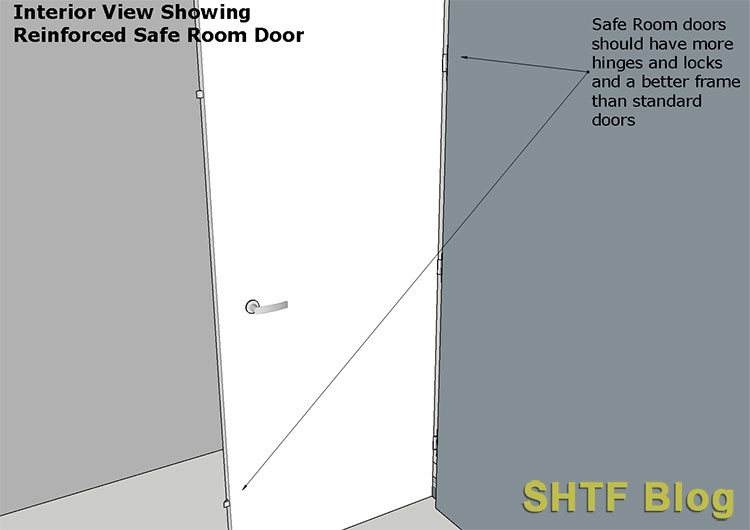
The doors and windows can be constructed using above material specs as a guide. I would recommend installing a few defensive/offensive “slots” in the door or walls of steel cages. Sliding trap designs will work well for this.
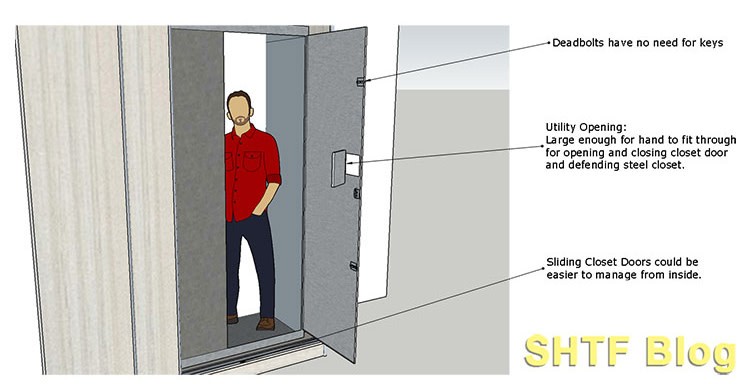
You also buy commercially available safe room door units. The high-end ones are great options, and provide extreme protection. Fortifying a door is also a good option. A random locked door in a passage could be mistaken for a storage room of some sort.
Whereas ventilation makes sense, keep in mind that it can also be an attack vector for gas or flammable liquids.
Panic Room Contents
Panic rooms only come into play during the course of a dangerous event. As you close the door of the room behind you, you literally have no idea how long you will be spending inside. It could be a few hours or literally days. You need to be prepared for the worst.
The following is a list of panic room necessities:
- First aid kit along with a stockpile of any chronic medication like insulin or asthma inhaler
- Sustenance, consisting of fluids and nutrition
- Headlamps, torches and emergency candles
- Cellphone chargers or battery packs
- Ham radio, telephone landline and extra cellphone
- Alarm trigger or remote panic buttons
- CCTV system to view what’s going on outside
- Clothing and blankets
- Chairs or bunk beds
- Firearms and ammunition
- Portable loo
- Fire extinguisher
- Standard PPE, ear, eye and head protection
- Demolition equipment including sledge hammer, crowbar and steel hack saw (grinder for steel cage)
- Spare keys for doors and also cars
- Gas masks or breathing apparatus
- Bulletproof vests
This should be standard in panic rooms aimed at both human and natural forces threats. It’s a long list, and maybe not possible to include everything right from the start, but build up to it.
How to Build a Panic Room – Concluding Remarks
It is important to register your panic room with local authorities. If you have to retreat there for safety during a natural disaster, they may conduct a survey of registered safe rooms after a disaster to see if anyone is trapped inside. This may also help them when responding to a robbery in progress, or with post incident investigation.
The panic room ideas I dealt with in this article are focused toward protection from human threats. This includes all human threats: abusive spouses, stalkers, rapists, any type of criminal activity.
Having read the article, you will realize that protecting against all threats is really difficult. I do believe that it can be done, but will need a few specific parameters to achieve this.
The panic rooms discussed in this article, should keep you safe or at the minimum, buy you some time. If you want one more resource to consider, see our article on free fallout shelter designs. Many of these designs could also be improvised to build a panic room that will keep human threats at bay while simultaneously doubling as a safe room for natural disasters or even tripling as a safe room also against nuclear fallout.
No comments:
Post a Comment